
Buying a used caravan without a proper inspection is one of the most expensive mistakes you can make. Hidden damp, faulty gas systems, and structural issues can lurk beneath a freshly polished exterior, turning your dream of open-road adventure into a costly repair nightmare. It’s a risk that catches far too many buyers off guard.
If you’ve ever stood in front of a second-hand caravan wondering exactly what to look for, you’re not alone. Most buyers simply don’t know where to start, and sellers aren’t always forthcoming about underlying problems. That uneasy feeling before signing on the dotted line is completely understandable.
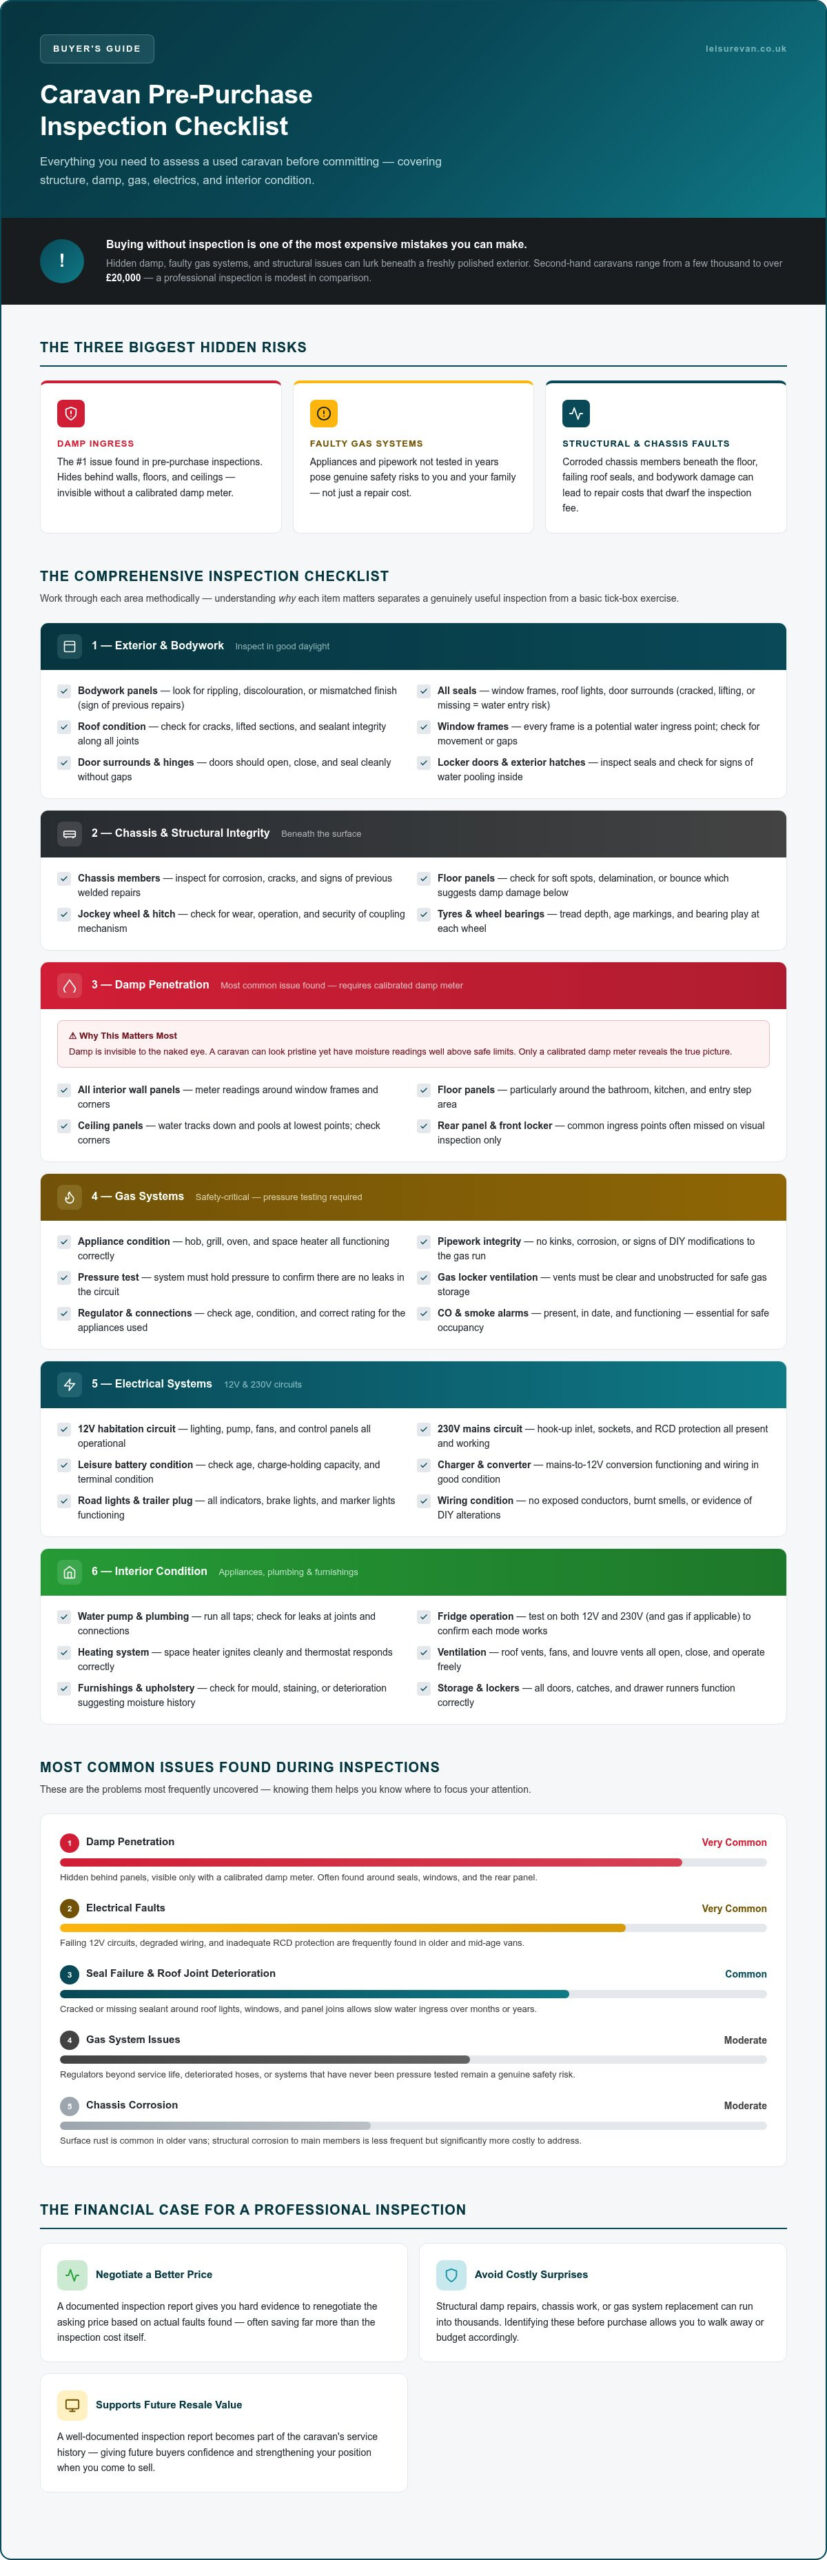
That’s precisely why having a reliable caravan pre-purchase inspection checklist is so important. This guide gives you a clear, practical framework for assessing any caravan before you commit, covering everything from the chassis and bodywork through to gas safety, electrics, and damp. By the time you’ve finished reading, you’ll know exactly what to inspect, what warning signs to watch for, and how a professional pre-purchase inspection can give you genuine confidence in your buying decision.
Key Takeaways
- A thorough caravan pre-purchase inspection checklist covers everything from exterior bodywork and windows to interior appliances, plumbing, and furnishings — giving you a complete picture of a caravan’s true condition before you buy.
- Damp penetration and electrical faults are amongst the most common issues found during pre-purchase inspections, and knowing the early warning signs can save you from significant repair bills down the line.
- The cost of a professional inspection is modest compared to the potential expense of hidden structural or safety defects — making it one of the smartest financial decisions you can make when buying second-hand.
- A well-documented inspection report can positively influence resale value, giving future buyers confidence and strengthening your position in the market when the time comes to sell.
- LeisureVan’s mobile pre-purchase inspection service comes to you, making the process straightforward and convenient wherever the caravan is located across South Yorkshire.
Why a Caravan Pre-Purchase Inspection is Essential
A used caravan is a significant financial commitment. Prices for second-hand tourers can range from a few thousand pounds for an older model to well over £20,000 for a more recent, well-equipped van. At that level of investment, buying without a thorough inspection isn’t just risky, it’s genuinely unnecessary. The right checks, carried out before you hand over any money, can reveal problems that simply aren’t visible to the untrained eye.
The real danger isn’t the obvious damage you can see. It’s the hidden issues you can’t. A caravan that looks immaculate on a sunny Saturday morning could be concealing damp ingress behind the walls, corroded chassis members beneath the floor, or a gas system that hasn’t been tested in years. Any one of these problems can translate into repair costs that dwarf the price of a professional inspection.
Beyond the financial argument, there’s a straightforward safety case. Caravans contain gas appliances, 12V and 230V electrical systems, and pressurised water supplies, all of which require regular maintenance to operate safely. Buying a caravan with an uninspected gas system isn’t just costly if something goes wrong; it’s a genuine risk to you and your family. A comprehensive inspection addresses all of these concerns systematically, giving you a clear, documented picture of the caravan’s condition before you commit.
What Does a Pre-Purchase Inspection Involve?
A professional pre-purchase inspection covers the full spectrum of a caravan’s key systems. A qualified inspector will assess:
- Structural integrity: chassis condition, bodywork, roof seals, and window frames
- Damp penetration: using a calibrated damp meter to check walls, floor, and ceiling panels
- Gas systems: appliance condition, pipework integrity, and pressure testing
- Electrical systems: 12V and 230V circuits, battery condition, and habitation electrics
- Interior condition: furnishings, appliances, water systems, and ventilation
Choosing a qualified inspector matters. Look for someone with demonstrable experience in leisure vehicle inspection rather than a general mechanic. The resulting report not only informs your buying decision but can also support the caravan’s resale value further down the line, giving future buyers documented evidence of its condition and history. Using a proper caravan pre-purchase inspection checklist as the basis for that report ensures nothing important gets missed.
Local Mobile Services: Convenience at Your Doorstep
One practical barrier buyers often face is logistics. The caravan is at the seller’s location, you’re elsewhere, and arranging a traditional workshop inspection feels complicated. Mobile inspection services solve this directly. LeisureVan Service Solutions operates across South Yorkshire, travelling to wherever the caravan is located so the inspection happens on-site, at a time that suits both you and the seller.
There’s no need to transport the caravan, no workshop waiting lists, and no unnecessary delays in your buying process. You can book an inspection straightforwardly, and the inspector arrives with the equipment needed to carry out a thorough assessment on the spot. The outcome is a detailed written report you can rely on, delivered without the usual hassle.
Your Comprehensive Caravan Pre-Purchase Inspection Checklist
Knowing what to check is only half the battle. Understanding why each item matters is what separates a genuinely useful caravan pre-purchase inspection checklist from a basic tick-box exercise. Work through each area methodically, and you’ll build a clear, honest picture of what you’re actually buying.
Exterior Checks: What to Look For
Start outside, in good daylight, and take your time. Run your hand along the bodywork panels and look for rippling, discolouration, or patches where the finish doesn’t quite match. These are often signs of previous repairs, which isn’t automatically a dealbreaker, but they do warrant further investigation into the cause.
Pay particular attention to the seals. Every joint, window frame, roof light, and door surround is a potential entry point for water. Seals that are cracked, lifting, or missing entirely are a serious red flag. Press gently around window frames and roof edges; any softness in the surrounding panel suggests water has already found its way in.
Before you move inside, check the VIN (Vehicle Identification Number) plate, typically located on the A-frame or chassis rail. Confirm it matches the documentation. A discrepancy here should stop the purchase immediately. Whilst you’re underneath, look at the chassis rails for surface rust, corrosion, or signs of previous welding repairs.
Interior Features and Safety Checks
Inside, work systematically from front to back. Test every appliance: hob burners, grill, oven, fridge on both mains and gas, and the space heating system. Check that the heating fires up promptly and that the thermostat responds correctly. A heating system that’s slow to ignite or produces an unusual smell needs professional attention before use.
Inspect the plumbing by running the taps and checking beneath the sink and around the toilet cassette housing for any signs of staining or moisture. Even minor drips can indicate failing pipe joints or damaged seals that will worsen with use.
Safety equipment deserves its own moment. Confirm there’s a working smoke alarm, a carbon monoxide detector, and a fire extinguisher or fire blanket. Check the gas system visually for any pipework that looks kinked, corroded, or improperly routed. A professional gas safety check is the only way to verify the system is truly safe.
Mechanical and Structural Integrity
Check the tyres carefully. Look for tread depth across the full width of each tyre, sidewall cracking, and any bulging. Age matters as much as wear; tyres over five to seven years old are often recommended for replacement regardless of apparent condition, as the rubber degrades structurally over time.
Test the brakes by applying the handbrake and checking for resistance. If you can move the caravan with the brake fully applied, the system needs immediate attention. Ask for any available service history, particularly records of brake adjustments or wheel bearing replacements.
- Chassis: Check for corrosion, cracks, or evidence of repair welding
- Axle: Look for fluid leaks around the hubs and uneven wear patterns on the tyres
- Tyres: Minimum 1.6mm tread depth legally, though 3mm is a more practical threshold for touring
- Brakes: Confirm the handbrake holds and that brake shoes have been adjusted within the last service period
- Jockey wheel and hitch: Check for smooth operation and secure locking
If any of these mechanical checks raise concerns, a specialist fault diagnosis can identify exactly what needs attention before you commit to the purchase.
Working through this checklist thoroughly takes time, but it’s time well spent. If you’d rather have a qualified professional carry out the full assessment on your behalf, arranging a pre-purchase inspection with LeisureVan is a straightforward way to get a complete, documented report without missing anything critical.
Common Issues Found During Pre-Purchase Inspections
Even a caravan that presents well on first viewing can be harbouring problems that only a systematic inspection will uncover. Understanding the most common issues found during pre-purchase checks helps you know what questions to ask, what to look for, and crucially, what the financial consequences of missing them might be. Skipping an inspection doesn’t eliminate these problems; it just means you discover them after you’ve already paid.
Understanding Damp Issues
Damp is consistently the most prevalent problem uncovered during caravan inspections, and it’s the one most likely to catch buyers off guard. Water ingress rarely announces itself with obvious staining or visible mould. More often, it hides behind wall panels, beneath floor coverings, and above ceiling linings, quietly causing structural deterioration for months or years before it becomes apparent.
During a thorough inspection using a calibrated damp meter, readings above 15% in wall panels typically indicate moisture levels that warrant further investigation. Anything above 20% points to active ingress that needs immediate attention. The specific areas to scrutinise include:
- Corner joints and roof-to-wall seams: where panel bonding is most likely to fail over time
- Around window and door frames: particularly where sealant has aged or cracked
- The floor around the washroom and kitchen: where plumbing connections and cassette toilet housings are common sources of slow leaks
- Overhead lockers near roof lights: a frequently overlooked entry point
Left unaddressed, damp causes the timber framework within the caravan’s walls to soften and rot. What begins as a relatively contained repair can escalate into full panel replacement once the structural timber is compromised. Repair costs in these situations can run into thousands of pounds, making early detection through a professional damp inspection an investment that pays for itself many times over.
If damp is identified, the practical path forward depends on the severity. Minor surface readings may simply require resealing and monitoring. Moderate ingress typically needs panel removal, timber treatment, and resealing of the source. Significant structural damp is a more serious matter and should factor heavily into any price negotiation or, in some cases, the decision to walk away entirely.
Electrical and Gas Safety Considerations
Electrical faults are the second most common category of issues found during inspections, and they range from the merely inconvenient to the genuinely hazardous. Corroded connections at the 12V leisure battery, damaged wiring behind habitation panels, and faulty hook-up sockets are all regularly discovered during thorough checks. A hook-up socket with a cracked casing or loose internal connections presents a real risk of electric shock or fire, particularly in damp conditions.
Signs that warrant closer electrical investigation include:
- Lights that flicker or fail to illuminate consistently
- Appliances that only work on one power source (gas but not mains, or vice versa)
- A consumer unit with tripped breakers or signs of heat damage around terminals
- Any evidence of non-standard wiring or DIY modifications to the electrical system
Gas safety is a different matter entirely. The consequences of a faulty gas system aren’t financial; they’re potentially life-threatening. Corroded pipework, poorly fitted connections, and appliances that haven’t been serviced in years are all found during pre-purchase inspections with uncomfortable regularity. A visual check can identify obvious concerns, but only a pressure test conducted by a qualified engineer can confirm whether the system holds integrity. A professional gas safety check is the only reliable way to verify compliance and ensure the system is safe to use.
Wear and tear on interior fittings, whilst less dramatic, also accumulates into meaningful cost. Warped locker doors, failing drawer runners, worn upholstery, and damaged worktops are all common findings that are easy to overlook in the excitement of viewing a caravan. Each item individually may seem minor, but collectively they build a picture of how well the caravan has been maintained, and how much you’re likely to spend bringing it up to standard.
A comprehensive caravan pre-purchase inspection checklist addresses all of these areas methodically. If any of the issues described here raise concerns about a caravan you’re considering, arranging a professional inspection before you commit is the clearest way to know exactly what you’re dealing with.
The Financial Benefits of a Pre-Purchase Inspection
There’s a straightforward financial logic to pre-purchase inspections that’s easy to overlook when you’re excited about a caravan you want to buy. The inspection itself carries a cost. What it can save you is considerably more.
Investing in Peace of Mind
Consider what the most common hidden defects actually cost to put right. Structural damp requiring panel replacement and timber remediation can run to several thousand pounds depending on the extent of the damage. A gas system that fails a pressure test and needs pipework replacement, new appliance seals, and a full recommission represents a significant outlay before you’ve even taken the caravan on its first trip. Chassis corrosion requiring specialist repair or section replacement is another cost that buyers who skip an inspection discover only after they’ve signed. Against those figures, the cost of a professional pre-purchase inspection is modest by comparison.
Beyond straightforward repair costs, a thorough inspection gives you genuine negotiating leverage. If a caravan pre-purchase inspection checklist reveals issues that the seller either wasn’t aware of or didn’t disclose, you’re in a far stronger position to renegotiate the asking price. In many cases, buyers recoup the cost of the inspection through the reduction they achieve on the purchase price alone. That’s before accounting for the repairs they avoid funding.
There’s also the question of what you don’t pay for. A caravan with a clean inspection report is one you can use with confidence from day one. No unexpected workshop bills in the first season. No discovering mid-trip that the heating system is unreliable or that the electrics have a fault that should have been caught before purchase.
Maximising Resale Value
An inspection report doesn’t just protect you at the point of purchase. It becomes a document of genuine value when you eventually come to sell.
Buyers are increasingly savvy. A caravan offered with documented inspection history, showing its condition was independently verified at the time of purchase, carries a credibility that a caravan without any paperwork simply can’t match. That transparency builds buyer confidence, supports your asking price, and can meaningfully shorten the time the caravan sits on the market.
- Documented condition: An inspection report gives future buyers independent evidence of the caravan’s state at the time of your purchase
- Stronger asking price: Verified history supports a higher valuation and reduces the scope for buyers to negotiate aggressively on price
- Faster sale: Transparency reduces buyer hesitation, which is one of the most common reasons private sales stall
The financial case for a professional inspection is clear at both ends of ownership. If you’re ready to buy with confidence, book a pre-purchase inspection with LeisureVan and get a detailed report you can rely on before you commit.
Book Your Pre-Purchase Inspection Today
You’ve worked through the checklist, you understand what the common issues look like, and you know what a thorough inspection should cover. The next step is straightforward: arrange one before you commit to buying. LeisureVan Service Solutions operates a fully mobile pre-purchase inspection service across South Yorkshire, coming directly to wherever the caravan is located so you don’t have to deal with the logistics of moving it to a workshop.
Booking is simple. Visit the LeisureVan booking page, provide the details of the caravan and its location, and choose a time that suits you and the seller. There are no waiting lists or complicated processes. The inspector arrives equipped to carry out a complete assessment on-site, covering everything your caravan pre-purchase inspection checklist demands, from damp testing and gas safety through to structural and electrical checks.
How to Prepare for Your Inspection
A little preparation on your part helps the inspection run smoothly and ensures you get the most from it. Before the inspector arrives, gather whatever documentation is available: service history records, owner’s manuals, gas certificates, and any receipts for previous repairs. These don’t guarantee the caravan’s condition, but they provide useful context and can highlight gaps worth questioning.
Make sure the caravan is accessible. Awning lockers, under-bed storage, and the area beneath the van should all be reachable without obstruction. If the seller is present, that’s genuinely helpful; they’ll be able to answer questions about how appliances have been used and whether any known issues exist.
Write down your questions beforehand. If something has already caught your eye during a viewing, mention it to the inspector at the start. A good inspector will address your specific concerns within the broader assessment rather than working to a rigid script.
Post-Inspection Steps
Once the inspection is complete, you’ll receive a detailed written report covering every area assessed. Read it carefully and don’t rush past the technical sections. Pay attention to any items flagged as requiring attention and ask the inspector to clarify anything that isn’t immediately clear.
The report then becomes a practical tool. If issues are identified, you have three clear options: negotiate a price reduction that reflects the cost of remediation, ask the seller to address specific problems before purchase, or, where defects are significant enough, walk away with confidence. A documented caravan pre-purchase inspection checklist report puts that decision firmly in your hands, based on facts rather than guesswork.
- Minor findings: Use as a basis for modest price negotiation or factor into your maintenance budget
- Moderate issues: Seek a reduction that reflects realistic repair costs, or request remediation before exchange
- Significant defects: Treat the report as permission to walk away without hesitation
Ready to buy with confidence? Book your pre-purchase inspection with LeisureVan and get the clear, honest picture you need before you sign anything.
Buy with Confidence and Hit the Road Without Regrets
A second-hand caravan can be a brilliant purchase or a costly mistake, and the difference almost always comes down to what you know before you sign. Working through a thorough caravan pre-purchase inspection checklist gives you the factual basis to negotiate fairly, walk away when necessary, and buy with genuine confidence when the right van comes along.
The key points are simple: hidden damp and gas faults are far more common than sellers typically acknowledge, a documented inspection report protects your investment at both ends of ownership, and the cost of getting it wrong far outweighs the cost of getting it right.
LeisureVan’s mobile inspection service covers South Yorkshire, coming directly to the caravan’s location and delivering a thorough, detailed report you can act on straight away. No workshop logistics, no guesswork, just clear answers before you commit.
Book your pre-purchase inspection with LeisureVan today and start your caravan ownership journey on solid ground.
Frequently Asked Questions
What is included in a caravan pre-purchase inspection?
A professional caravan pre-purchase inspection checklist covers all the major systems and structural elements of the van. This includes damp testing of walls, floor, and ceiling panels using a calibrated meter; gas system integrity checks; 12V and 230V electrical assessments; chassis and bodywork examination; tyre and brake condition; and a full review of interior appliances, plumbing, and ventilation. The outcome is a detailed written report documenting the condition of each area assessed.
How long does a pre-purchase inspection take?
A thorough inspection typically takes between two and three hours, depending on the size of the caravan and its overall condition. More complex vans with additional appliances or systems, such as solar panels or air conditioning, may take slightly longer. Rushing the process risks missing hidden issues, so it’s worth allowing adequate time and ensuring the caravan is accessible and ready when the inspector arrives.
How much does a caravan pre-purchase inspection cost?
We don’t publish fixed pricing here, as costs can vary depending on the caravan and its location. Contact LeisureVan directly for a clear quote before booking. What’s worth keeping in mind is that the cost of an inspection is consistently modest compared to the repair bills that hidden defects can generate. In many cases, buyers recover the inspection fee through price reductions negotiated off the back of the report findings.
Can I attend the inspection?
Yes, and it’s actively encouraged. Being present means you can ask questions in real time, understand what the inspector is finding as they work through each area, and get a clearer sense of the caravan’s overall condition before you receive the written report. It also gives you the opportunity to flag anything specific you’ve already noticed during your own viewing, so the inspector can pay particular attention to those areas.
What should I do if issues are found during the inspection?
The written report gives you a factual basis for your next steps. Minor findings can inform modest price negotiations or be factored into your maintenance budget. Moderate issues, such as damp ingress or failing seals, may warrant requesting remediation before purchase or seeking a price reduction that reflects realistic repair costs. Significant defects, particularly structural problems or gas system failures, are legitimate grounds to walk away entirely. The report puts that decision in your hands, based on evidence rather than guesswork.
Are mobile inspections as thorough as those done in a workshop?
Yes. LeisureVan’s mobile inspections are carried out using the same calibrated equipment and systematic approach you’d expect in a fixed workshop setting. The inspector arrives fully equipped to assess damp levels, gas system integrity, electrical circuits, chassis condition, and all interior systems on-site. The practical advantage is that the caravan doesn’t need to be moved, which removes a significant logistical barrier for both buyers and sellers.
How often should I have my caravan inspected after purchase?
An annual habitation service is the standard recommendation for caravans in regular use. This covers the key safety systems, including gas appliances, electrical circuits, and damp levels, and helps catch developing issues before they become costly repairs. If your caravan has been in storage for an extended period, or if you’ve recently bought one without a full service history, a habitation check before your first trip is a sensible precaution regardless of when the last inspection took place.