

Your motorhome might look pristine on the surface, but beneath the wallboards, a silent leak could be devaluing your investment by thousands of pounds right now. It’s a common fear for every owner in the UK, especially when you consider that water ingress often remains invisible until structural rot has already set in. Learning how to check for damp in a motorhome yourself is the most effective way to catch these issues early. By performing regular monthly inspections, you create an essential early warning system that protects your peace of mind and your vehicle’s resale value.
We understand that moisture meter readings can feel confusing and the thought of hidden repair costs is genuinely stressful. This guide removes that uncertainty by sharing the exact professional techniques used by AWS-approved engineers. You’ll discover how to use a moisture meter with total confidence, understand why a 15% reading differs from a 30% risk, and follow a clear DIY checklist to keep your leisure vehicle in top condition. We’ll also help you identify the precise moment when a small DIY concern requires a professional damp inspection and report to safeguard your manufacturer warranty.
Key Takeaways
- Master the sensory ‘early warning’ checks that help you detect hidden moisture through smell, sight, and touch before structural rot sets in.
- Follow a systematic 8-point visual inspection to learn how to check for damp in a motorhome yourself, focusing on high-risk areas like roof lights and solar panel glands.
- Discover the professional ‘Grid Method’ for using a moisture meter, allowing you to map wall panels accurately whilst avoiding common false positives from metal framing.
- Learn to interpret moisture percentage readings with confidence, distinguishing between normal levels and the critical zones that require immediate remedial work.
- Understand the vital role of professional damp reports in maintaining your manufacturer warranty and securing the long-term resale value of your vehicle.
The Essential DIY Motorhome Damp Inspection Toolkit
Maintaining a recreational vehicle in the damp climate of the UK requires more than just a quick glance. To master how to check for damp in a motorhome yourself, you must move beyond guesswork and assemble a reliable toolkit. Your most vital investment is a moisture meter. While professional engineers use high-end equipment, a basic digital meter is a fantastic starting point for monthly checks. It provides the data you need to spot trends before they become expensive structural repairs.
Your own senses are equally important. This ‘sensory kit’ costs nothing but requires a disciplined approach. Use your nose to detect that tell-tale musty scent that often precedes visible damage. Use your eyes to scan for ‘bloom’ or discolouration on wallboards; use your touch to feel for any unexpected softness or ‘give’ in the panels. Combine these with a high-powered LED torch to highlight changes in surface texture and a telescopic mirror to peek behind lockers or under bed frames. Keeping a dedicated damp log to record your monthly findings is a smart habit. It allows you to see if a reading is rising over time, which is often more telling than a single snapshot.
Choosing the Right Moisture Meter: Pin vs Pinless
Pin meters work by pushing two small probes into the wallboard to measure electrical resistance. They’re highly accurate but they do leave tiny, unsightly holes in your interior finish. Pinless, or inductive, meters use a sensor pad to scan beneath the surface without causing damage. These are excellent for checking deeper into the structure without leaving a mark. Many owners prefer a hybrid approach, using a pinless meter for routine scans and a pin meter only when they need to verify a suspicious reading. Professional technicians often carry both to ensure absolute accuracy during a thorough inspection.
Calibrating Your Expectations
Readings can vary significantly based on the environment. In South Yorkshire, our naturally higher humidity levels can sometimes skew DIY results. It’s essential to understand that every motorhome has a ‘baseline’ moisture level; it’s rarely 0%. Before you begin your full inspection, test a ‘known dry’ area, such as a panel in the centre of the living space away from any windows or plumbing. This gives you a reference point for the rest of your vehicle. Be aware that metal framing or internal wiring can cause false positives on pinless meters. While a DIY check is a great start, a professional damp inspection and report provides the technical depth needed for warranty claims and total peace of mind.
Where to Check for Damp: The 8-Point Visual Inspection
Begin your inspection at the highest point. Gravity ensures that water ingress at the roofline eventually travels down through the wall structure, making roof lights and solar panel glands the primary suspects for leaks. Check for any hairline cracks in the sealant or plastic surrounds. These small defects are often the entry point for significant volumes of water during heavy UK downpours. Whilst you’re on the roof, examine the awning rail. These rails can channel water directly into the frame if the sealant has degraded over time, often leading to rot that remains hidden for months.
Move your focus to the window and door seals. Examine the rubber for ‘bloom’, a white powdery residue, or any signs of brittleness. If the rubber feels hard or shows signs of cracking, it’s no longer providing a watertight barrier. Inside the vehicle, focus on internal corners and wallboards. Use a ‘soft touch’ test by applying gentle pressure with your thumb. If the panel feels slightly hollow or gives way, it’s a strong indicator of underlying structural compromise. Learning how to check for damp in a motorhome yourself allows you to catch these minor seal failures before they escalate into major repairs.
Don’t forget the external furniture fixings and any through-wall penetrations like aerial points or external sockets. These are common failure points where water can seep behind the outer skin. For a comprehensive overview of what to look for, comparing your findings against a professional damp check guide can help you understand the severity of any issues you discover. If you find something suspicious, you can request a professional inspection to confirm the source of the ingress.
The ‘Hidden’ Damp Hotspots
Damp often hides in the places we rarely look. Open every cupboard and use your torch to inspect the very back corners and the joints where the wall meets the ceiling. Inspect the area behind the driver and passenger seats; condensation often gathers here, but it can also mask a leak from the cab-to-body join. Pay close attention to the floor-to-wall joints underneath the chassis. The garage area and gas locker are frequently neglected, yet they are highly susceptible to road spray and seal failure. These areas should be a priority in your monthly routine.
Sensory Red Flags: What Your Body is Telling You
Your senses are highly effective detection tools. A ‘musty’ smell is a definitive red flag; it’s the specific scent of stagnant water trapped within the wall insulation. Distinguishing between surface condensation marks and active ingress is crucial. Condensation usually wipes away easily, whilst active damp leaves a persistent stain or tide mark that feels cold to the touch. If you feel ‘sponginess’ in the floor or walls, the water has likely compromised the structural ply. This tactile feedback is often the final warning before a leak becomes a structural emergency.
How to Use a Moisture Meter Like a Professional
Professionals don’t just test random spots on a wall. They use a systematic approach called the ‘Grid Method’. This involves mentally dividing a wall panel into a series of squares, typically 15cm apart. By taking a reading in each square, you can map the moisture levels across the entire surface. If you notice a sudden spike in one specific area, you’ve likely identified the exact point of water ingress. This methodical style ensures you don’t miss small patches of damp that might be hiding between your more obvious inspection points.
Learning how to check for damp in a motorhome yourself also means knowing when your equipment is being fooled. Metal framing, aluminium skins, and internal electrical cables can all trigger false positives on a moisture meter. These materials interfere with the electrical resistance or capacitance the meter is trying to measure. If you find a high reading that follows a perfectly straight vertical or horizontal line, it’s often a structural member or a cable run rather than a leak. Identifying these internal structures prevents unnecessary anxiety over ‘ghost’ damp readings.
Timing and environment are critical for accuracy. Never test your vehicle immediately after washing it or following a heavy South Yorkshire downpour. Surface water can linger in seals or create a film on the wallboard, leading to artificially high results. Give the vehicle at least 24 to 48 hours to dry in stable conditions. Temperature also plays a role. In a freezing winter, moisture can freeze within the structure, which significantly alters meter readings. Always ensure the interior of the motorhome is warmed through before you begin your inspection to ensure the moisture is in a detectable liquid state.
Step-by-Step: Taking an Accurate Reading
Start by cleaning the target area with a dry, lint-free cloth. This removes surface condensation or dust that might interfere with the sensor. When using pinless sensors, apply firm and consistent pressure against the wallboard. Variations in pressure can change the depth of the scan, leading to inconsistent data. Record every result in a dedicated diagram of your motorhome layout. This visual map is far more effective for spotting long-term trends than a simple list of numbers in a notebook.
Advanced Tip: The ‘Comparison’ Technique
If you discover a reading of 19% on a rear corner, immediately check the identical spot on the opposite side of the vehicle. Most motorhomes are built symmetrically. If the opposite side reads 10%, you have a localised issue that needs investigation. Using a professional Damp Inspection and Report from your previous annual service provides an excellent baseline for these comparisons. Also, look out for ‘cold spots’. These are areas of thermal bridging where insulation might be thinner, such as near locker fixings. These spots naturally attract condensation, which can sometimes mimic the profile of active ingress to an untrained eye.
Interpreting Your Results: The Moisture Percentage Guide
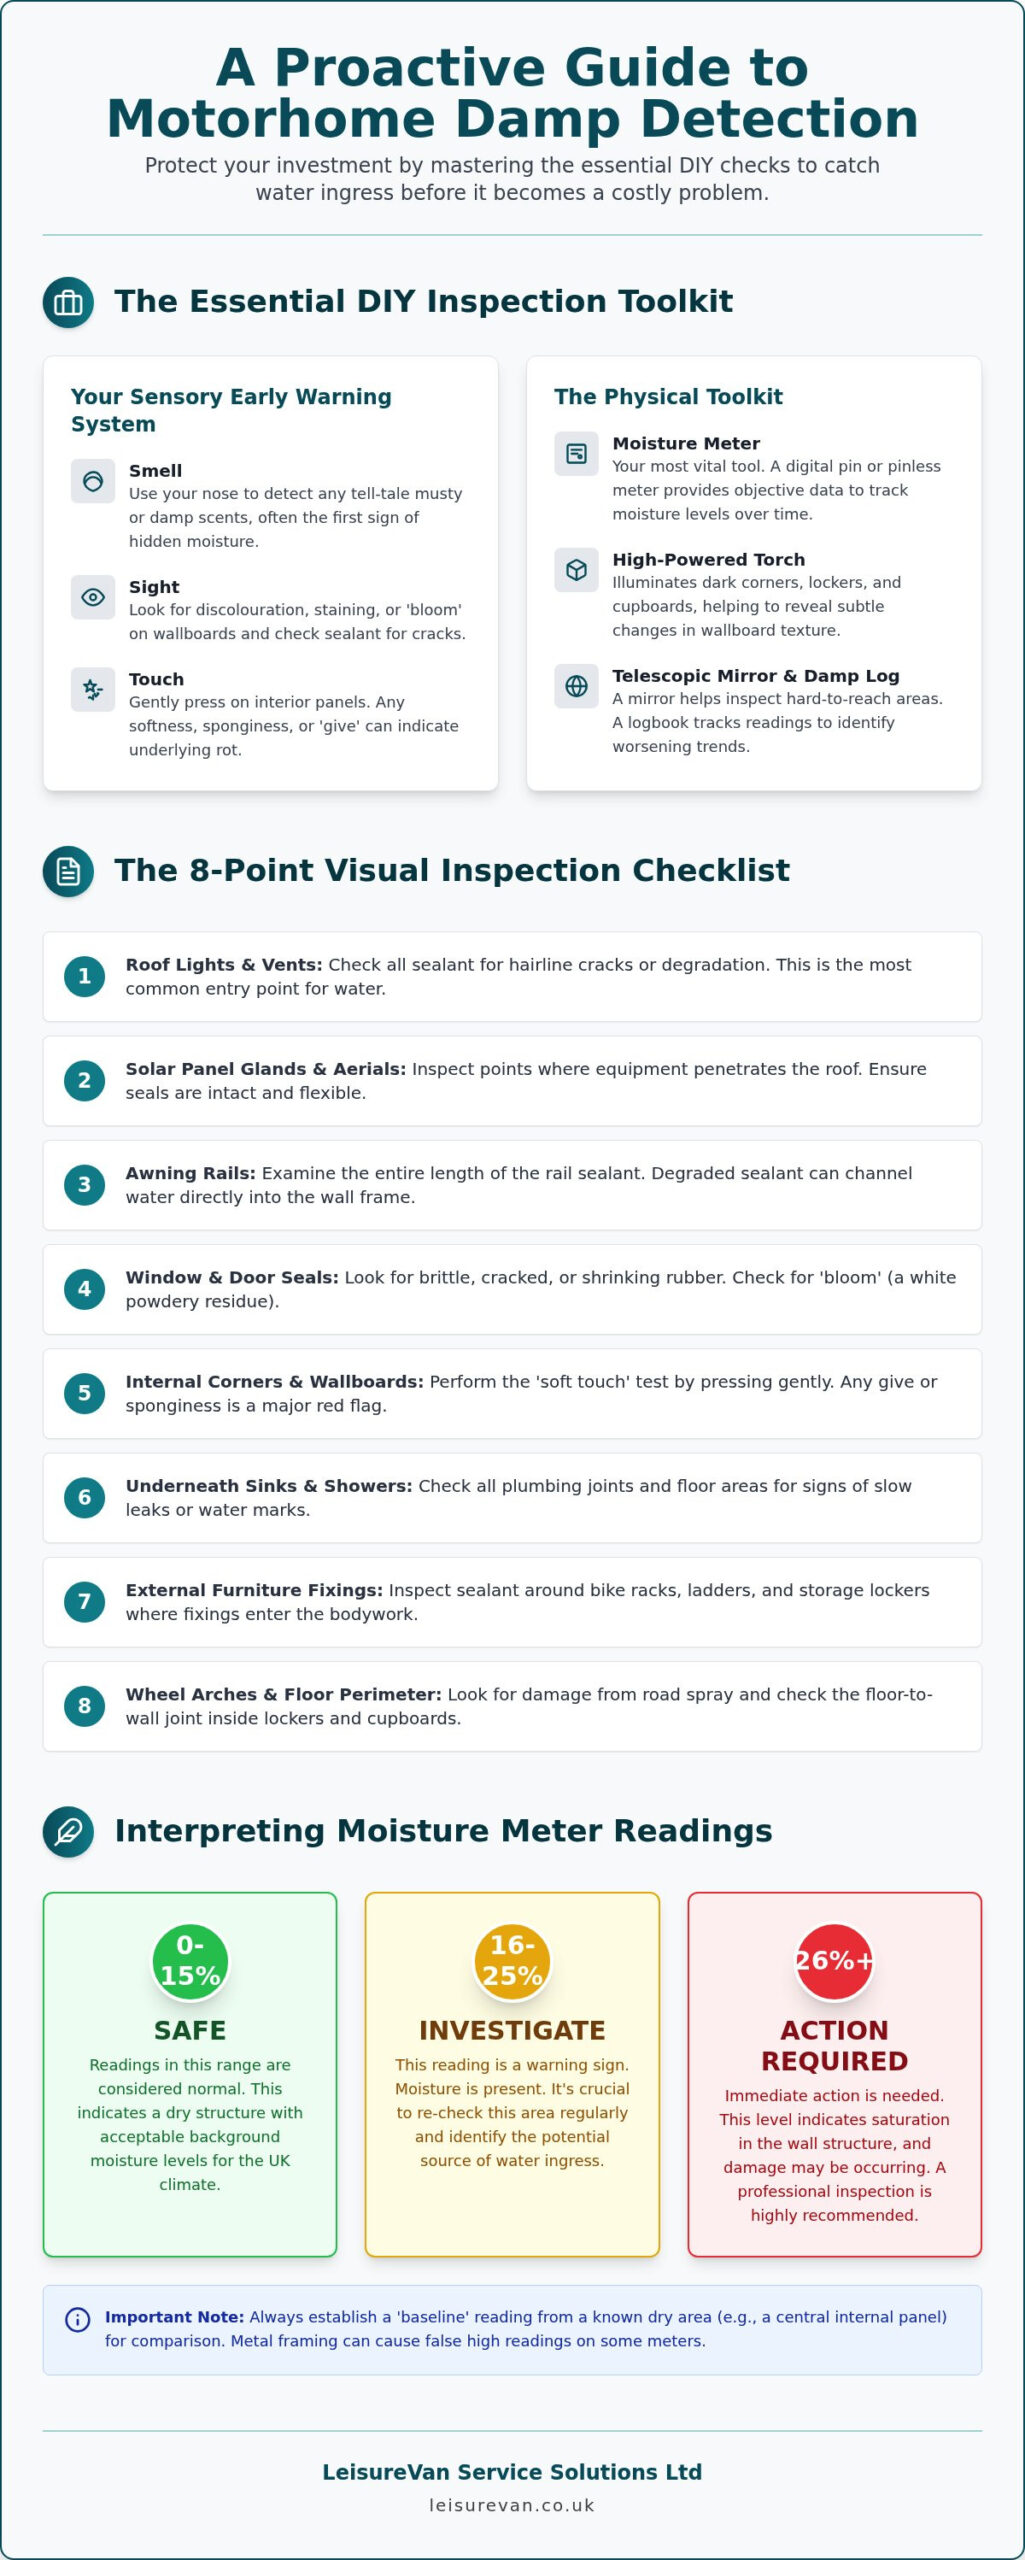
Once you’ve completed the process of how to check for damp in a motorhome yourself, you’ll be left with a series of percentage readings. It’s easy to feel overwhelmed by these numbers, but they provide a clear map of your vehicle’s health. Most UK motorhomes will naturally hold some moisture due to our humid climate. A reading between 0% and 15% is generally considered dry and normal. If your meter shows levels in this range, your seals are likely performing exactly as they should. You don’t need to take any action other than continuing your routine monthly monitoring.
A single high reading doesn’t always signal a disaster. As we explored in the previous section, metal framing, aluminium skins, or internal wiring can trigger false positives. If you find a reading of 25% in one tiny spot but 12% everywhere else, don’t panic. Re-test the area after a few days of dry weather or use the comparison technique. If the number remains high or begins to spread across your grid, it’s time to move from DIY monitoring to a professional assessment. Catching an ‘Amber’ reading early often means a simple reseal rather than a costly structural repair.
The Traffic Light System for UK Motorhomes
To make your DIY findings easier to understand, we use a simple traffic light scale based on industry-standard moisture levels:
- Green (0-14%): Perfectly dry. No remedial work is required.
- Amber (15-20%): A caution zone. This suggests moisture is present and requires further investigation. You should check your seals and increase ventilation immediately.
- Red (21% to 30%): Evidence of active water ingress. The moisture has likely reached the wallboard core. Professional repair is usually needed to prevent structural rot.
- Danger (Over 30%): This indicates a high risk of structural damage. At this level, the timber frame is likely saturated and requires urgent attention.
Condensation vs. Ingress: How to Tell the Difference
Surface moisture is incredibly common during winter storage, particularly in places like Barnsley where temperatures can drop sharply overnight. This isn’t always a leak; it’s often just condensation. To tell the difference, try the hairdryer test. Gently warm the suspicious area for a few minutes to dry the surface. If the moisture reading drops significantly, it was likely surface condensation. If the reading stays high, the moisture is trapped inside the board. For more advice on managing airflow, you can find preventing damp in a motorhome tips on our blog. If you’re concerned about a ‘Red Zone’ reading, we recommend you book a professional damp inspection to get a definitive report.
When DIY Isn’t Enough: The Case for Professional Habitation Checks
Knowing how to check for damp in a motorhome yourself is an excellent first line of defence. It allows you to catch minor leaks between services and provides a proactive way to monitor your vehicle’s health. However, a DIY check is a routine scan rather than a comprehensive safety audit. It cannot replace a professional Motorhome Habitation Service. Most manufacturers mandate an annual check by an approved workshop to keep your water ingress warranty valid. Without this certified paper trail, a future claim for structural repair could be rejected, leaving you with a significant bill.
A professional report also serves as a vital financial safeguard. When the time comes to sell, a folder full of annual damp reports adds thousands of pounds to your motorhome’s resale value. It proves to a potential buyer that the vehicle has been meticulously maintained and is free from hidden rot. This transparency transforms a standard sale into a “certified dry” investment. It gives the buyer total confidence and ensures you get the best possible price for your vehicle.
The ‘Mobile Advantage’ is a significant benefit for owners across South Yorkshire. You don’t need to navigate narrow workshop entrances or lose your vehicle for days at a time. We bring the expertise directly to your driveway in Sheffield, Rotherham, or Doncaster. This saves you time and ensures your leisure vehicle is ready for the road without the stress of complex logistics. We act as a safe pair of hands, providing technical authority with a friendly, local service.
What a Professional Damp Report Includes
Our reports provide a level of detail that basic DIY tools cannot match. We perform full 360-degree moisture mapping using calibrated, industry-standard meters that are far more sensitive than entry-level models. You receive formal, written documentation that is essential for insurance purposes or pre-sale peace of mind. If we identify a reading in the ‘Red Zone’ described earlier, we provide expert Fault Diagnosis to find the exact source of the leak. This prevents you from wasting money on temporary patches that don’t address the underlying structural issue.
Protecting Your Investment in South Yorkshire
The humid climate in the North of England presents unique challenges for motorhome storage. High rainfall and fluctuating temperatures create the perfect environment for condensation and ingress to take hold. LeisureVan identifies these issues long before they become a ‘soft wall’ disaster. By catching moisture at the ‘Amber’ stage, we help you avoid the high cost of structural timber replacement. Book your professional damp inspection with LeisureVan today to ensure your motorhome remains safe, dry, and valuable for years to come.
Secure Your Motorhome’s Future with Proactive Care
Mastering how to check for damp in a motorhome yourself is the most effective way to ensure your leisure vehicle stays in peak condition between annual services. By combining regular sensory inspections with methodical moisture meter mapping, you can identify early warning signs before they escalate into structural rot. These monthly habits create a vital safety net for your investment. It’s important to remember that DIY monitoring works best when paired with an annual professional audit to satisfy warranty requirements and insurance providers.
As an AWS Approved Mobile Workshop, LeisureVan provides the technical expertise and calibrated equipment needed for a definitive assessment. We provide full written damp reports that are essential for maintaining manufacturer warranties and protecting your vehicle’s resale value. Our mobile service covers Sheffield, Rotherham, and Doncaster; we bring professional standards directly to your driveway for total convenience. Don’t leave your peace of mind to chance. Book a Professional Damp Inspection & Habitation Service today and enjoy your next adventure with total confidence.
Frequently Asked Questions
Can I use a cheap wood moisture meter for my motorhome?
Yes, a basic wood moisture meter is a practical starting tool for anyone learning how to check for damp in a motorhome yourself. Since most traditional wallboards are timber-based, these devices provide a helpful indication of moisture levels. However, they lack the sophisticated calibration of professional equipment and may struggle to provide accurate data on modern, wood-free composite panels.
What is a ‘normal’ moisture reading in a UK motorhome?
A reading between 0% and 15% is considered normal and indicates a dry vehicle. If your meter shows between 15% and 20%, it’s a warning zone that requires closer monitoring or improved ventilation. Anything over 20% is evidence of active water ingress, whilst readings exceeding 30% suggest that structural timber rot is likely already occurring.
Will a DIY damp check void my manufacturer warranty?
Performing your own inspections won’t void your warranty, but it cannot replace the official requirements set by the manufacturer. Most brands require an annual habitation service conducted by an AWS-approved workshop to maintain your water ingress cover. DIY checks are an excellent way to spot issues early between these mandatory professional inspections.
How often should I check my motorhome for damp myself?
You should aim to conduct a DIY damp check at least once a month. This frequency is particularly important during the winter months or after periods of heavy rainfall when seals are under the most pressure. Regular monthly checks allow you to identify rising moisture trends long before they become visible to the naked eye.
What are the first signs of damp that I should look for?
Early signs are often sensory, such as a faint musty odour or wallboards that feel slightly soft when pressed. Look for black spotting around window frames or a white, powdery ‘bloom’ on rubber seals which indicates they are becoming brittle. Staining or tide marks on the interior wallboards usually suggest that ingress has been present for some time.
Does a motorhome habitation check include a full damp report?
Yes, a comprehensive Motorhome Habitation Service always includes a professional damp inspection and a written report. Whilst the service covers the safety of your gas, electric, and water systems, the damp survey is a core component. It uses calibrated equipment to map the entire structure, ensuring your vehicle remains watertight and warranty-compliant.
How can I prevent damp whilst my motorhome is in winter storage in South Yorkshire?
Maximising airflow is the best way to prevent moisture buildup during a South Yorkshire winter. Open all internal locker doors and cupboards to stop stagnant air pockets from forming. If you store your vehicle in Sheffield or Doncaster, visit monthly to open the windows for an hour and refresh the interior air, especially if you aren’t using a dehumidifier.
Is it worth buying a pinless moisture meter for DIY use?
A pinless (inductive) moisture meter is a fantastic investment for how to check for damp in a motorhome yourself because it is non-destructive. It allows you to scan large areas of your wallboards without leaving tiny pinholes in the decorative finish. Many owners prefer using a pinless meter for routine monthly scans and only use a pin-type meter to verify specific suspicious readings.