

A “sniff test” is the fastest way to lose thousands of pounds on a used caravan. Buying your next home-on-wheels should be the start of an adventure; however, the fear of discovering rotted timber frames or sodden wallboards behind a fresh coat of paint is enough to make any buyer feel uneasy. You might be facing pressure from a private seller to make a quick decision whilst wondering if you have performed a thorough enough caravan damp check before buying. It is a common worry, and one that often prevents people from securing a genuine bargain with total peace of mind.
This guide simplifies the entire process, showing you how to identify hidden water ingress before you part with your cash. You will learn exactly what moisture percentages like 15% or 30% actually mean for your wallet, where the most common “hidden” damp traps are located, and how your rights under the Consumer Rights Act 2015 protect you. We provide the technical clarity you need to negotiate with confidence or, if necessary, the professional insight to walk away from a bad deal. By understanding the signs of moisture early, you can protect your investment and ensure your future holidays remain dry and stress-free.
Key Takeaways
- Understand why damp is considered the “silent killer” of leisure vehicles and how structural rot can lead to repair costs that exceed the caravan’s market value.
- Master the sensory inspection techniques used by experts, from recognising specific musty odours to spotting subtle visual cues like wallboard pimpling and discoloured sealant.
- Learn how to perform a professional-grade caravan damp check before buying by correctly using a pin-type moisture meter to interpret readings with total accuracy.
- Identify the critical danger zones where water ingress is most likely to hide, including window surrounds, door frames, and vulnerable floor junctions.
- Discover the vital differences between a DIY survey and a professional pre-purchase inspection to ensure your investment is protected by a comprehensive technical report.
Why a Damp Check is Non-Negotiable Before Buying a Caravan
Damp is the “silent killer” of the leisure industry. It works slowly, often invisible to the naked eye whilst it rots the internal timber frame from the inside out. By the time you notice a soft spot on a wall or smell a musty odour, the damage is usually extensive. Performing a thorough caravan damp check before buying is the only way to ensure you aren’t purchasing a massive financial burden. For those new to the lifestyle, understanding what is a recreational vehicle includes acknowledging that these structures require constant vigilance against the British weather.
The psychology of a private sale can be tricky. Even an honest seller might be completely unaware of a slow-developing leak. Water ingress often begins as a microscopic failure in a sealant bead or a hairline crack in a plastic panel. It can take months for that moisture to seep through the wallboards and become detectable. You cannot rely on a seller’s reassurance alone. You need objective data to protect your investment.
The Real Cost of Water Ingress
Water ingress is the primary cause of delamination and timber rot in traditional caravan construction. When moisture enters the wall cavity, it destroys the structural bonding between the outer aluminium skin and the interior wallboard. This leads to instability that is both difficult and expensive to fix. Beyond the vehicle’s integrity, there is the human cost to consider. Trapped moisture creates a breeding ground for black mould. In a confined living space, this poses a genuine risk of respiratory issues for your family. In many cases, the cost of professional structural repairs on an older caravan will exceed its total market value, effectively writing the vehicle off.
Protecting Your Resale Value
A clean damp report is the most important document in your service history folder. It provides peace of mind for you and future owners alike. Professional buyers and dealers, particularly those looking for damp testing in South Yorkshire, will use any sign of moisture as a heavy negotiation lever to drop the price. Catching issues early prevents a minor leak from becoming a catastrophic failure. Regular checks protect your money. In the UK, insurance eligibility is also a factor. Many providers refuse to cover water damage if they believe it resulted from a lack of maintenance. A proactive approach saves your holiday and your bank balance.
Visual and Sensory Signs of Damp: The DIY Initial Inspection
Before you reach for a moisture meter, your natural senses provide the first layer of a thorough caravan damp check before buying. Walking into a caravan should feel like stepping into a fresh, dry living space. If you’re immediately hit by a heavy floral scent or the sharp smell of bleach, be cautious. Some sellers use strong air fresheners to mask the distinct, earthy odour of trapped moisture. Trust your nose; if it smells musty or damp, there’s almost certainly water ingress present somewhere, even if it isn’t visible yet.
A visual scan is your next line of defence. Look for “tide marks” or staining on the wallboards, particularly in the upper corners and inside cupboards. These stains often appear as faint brown or grey outlines where water has previously pooled. Check the sealant around windows and doors; if it’s peeling away or looks brittle, it’s a clear sign that the weather seal has failed. These simple observations can save you from a very expensive mistake.
What Your Senses are Telling You
Beyond the smell, look closely at the wallboards for “pimpling.” These are tiny, raised bumps that occur when moisture gets behind the vinyl covering and reacts with the plywood or adhesive. You should also perform a “firmness test” by pressing your thumb into the internal corners, around window frames, and near roof lights. If the wall feels spongy or gives way under light pressure, the timber frame beneath has likely begun to rot. These tactile checks are a vital part of your initial caravan damp check before buying.
External Bodywork Red Flags
The exterior of the caravan often reveals where the problems began. Inspect the mastic beads around the windows and doors. If the sealant is discoloured or “crazing” with tiny cracks, it’s no longer doing its job. The awning rail is perhaps the most critical external factor for damp. If the rail has been knocked or the sealant has failed, water will seep directly into the wall cavity. You should also check the front and rear ABS panels for hairline cracks, as these allow water to bypass the main seals entirely.
Whilst these DIY checks are helpful, they can’t replace the technical depth of a professional habitation check which uses calibrated equipment to find what the eyes can’t see. If you find minor issues that you’re willing to fix, you might want to read our guide on preventing damp to ensure the problem doesn’t return. If you suspect significant issues after your visual inspection, it’s often wise to request a professional inspection to get a definitive report before you commit your hard-earned money.
How to Use a Damp Meter: Interpreting the Readings
Once you have completed your visual and sensory inspection, the next step is to quantify your findings with a moisture meter. This is the most technical part of a caravan damp check before buying. Whilst your eyes can spot a stain, a meter identifies moisture that hasn’t yet reached the surface. For an accurate assessment, a pin-type moisture meter is the industry standard. These devices work by passing a small electrical current between two metal probes to measure the resistance of the material. Since water conducts electricity better than dry timber, a higher reading indicates a higher moisture content.
It is vital to understand that a moisture meter is a sensitive piece of equipment. In the UK’s often humid climate, surface condensation can sometimes trigger a false positive. This is why professional technicians often cross-reference readings with an Approved Workshop scheme for professional damp checks to ensure the data is interpreted correctly. If you are testing a caravan on a particularly cold or damp day in 2026, allow the vehicle to warm up slightly if possible, as extreme temperatures can occasionally skew the calibration of budget-friendly meters.
The Damp Reading Traffic Light System
Interpreting the numbers on the screen is where most buyers feel confused. To keep your inspection logical, follow this standard industry framework:
- 0-15%: Normal. These readings are typical for a dry caravan. No action is required, though you should continue to monitor these areas annually.
- 15-20%: Cautionary. This range suggests potential moisture ingress or heavy condensation. It requires further investigation to see if the levels rise after a period of rain.
- 20-30%: Investigation Required. Readings in this bracket indicate active water ingress. Structural damage may not be visible yet, but a repair is likely necessary.
- 30%+: Severe Damp. This signifies a major leak and structural rot. At this level, the timber is likely saturated and requires immediate professional intervention.
Techniques for Non-Destructive Testing
The biggest challenge during a viewing is performing a caravan damp check before buying without damaging the seller’s property. You should never force the meter pins into a visible wallboard in the main living area. Instead, focus your testing on hidden zones. Check the back of overhead cupboards, under the bed slats, and inside the gas locker. These areas often share the same wall structure but allow you to test the timber without leaving unsightly pin marks in plain view.
If a seller is hesitant about you using a pin-type meter, explain that you are only testing inconspicuous areas. If you discover readings that consistently sit in the “cautionary” or “danger” zones, it is time to seek expert help. A detailed damp inspection and report from a specialist can provide the documented proof you need to either negotiate a lower price or walk away from the deal entirely.
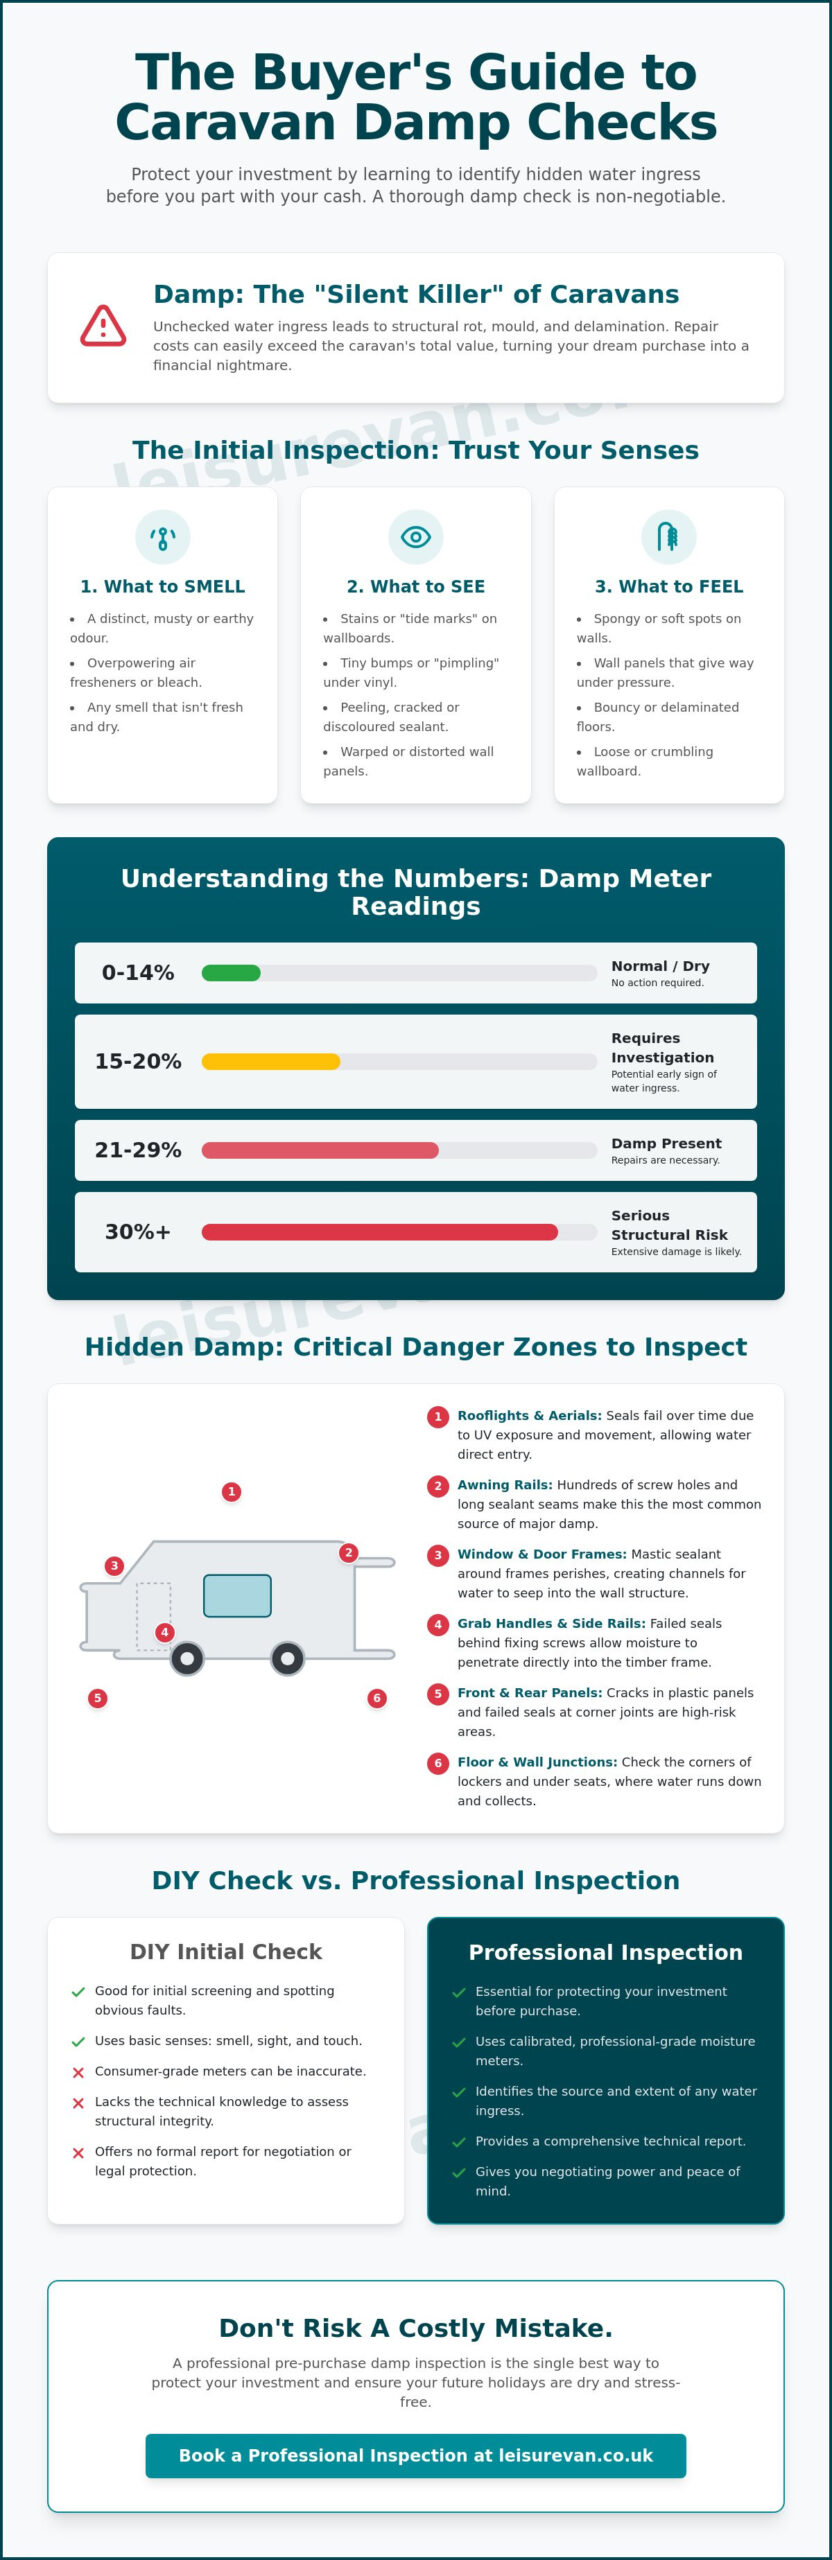
The Caravan Damp Checklist: Critical Danger Zones
Knowing how to use a meter is only half the battle. To perform an effective caravan damp check before buying, you must know exactly where to point it. Water ingress follows the path of least resistance, often entering through joins in the bodywork or where external components are screwed into the frame. Most generic guides suggest a “general scan,” but experienced buyers focus on specific high-risk zones where sealant is most likely to fail over time. A comprehensive caravan servicing history should show regular inspections of these areas, but you must verify the current condition yourself.
Start with the “Grab Handle Test.” This is a quick indicator of structural health. Give the external grab handles a firm but careful tug. If there is any movement or the handle feels “loose” in the bodywork, the internal timber frame it is anchored to has likely rotted away. Similarly, inspect every window and door surround. These are the most common entry points. Look for black streaks on the wallboards or rubber seals that have shrunk away from the frame, as these gaps allow British rain to seep directly into the wall cavity.
Roof lights and vents are equally vulnerable. Because they sit on a horizontal surface, water can pool around the seals during the winter months. Check the ceiling area immediately surrounding every roof opening. If the plastic trim is discoloured or the wallboard feels soft, the sealant on the roof has probably reached the end of its life.
High-Risk Internal Areas
Open every top locker and check the junction where the wall meets the ceiling. This is a prime spot for spotting early water ingress from the awning rail. You should also pay close attention to any point where the bodywork has been “punctured” for equipment. This includes:
- The area surrounding the battery box.
- External 240V power sockets.
- The shelf area directly underneath the front windows.
- Internal corners of the gas locker (inspecting from the inside of the living area).
These penetrations rely entirely on a thin bead of mastic for protection. Once that mastic dries out, water ingress is inevitable.
Checking the Floor and Chassis
The floor is often the most overlooked part of a caravan damp check before buying. Step firmly across the main walkway; if the floor feels “bouncy” or spongy, it indicates floor delamination. This happens when the glue holding the plywood and foam layers together fails, often due to heavy use or moisture. Always check the floor inside the bottom of the kitchen cupboards and around the shower tray. Rot in the four corners of the chassis is a major red flag, as structural repairs in these areas are notoriously difficult.
If your checklist reveals multiple cautionary signs, we recommend you book a professional pre-purchase inspection to avoid a costly mistake. A technical report provides the objective evidence you need to negotiate with confidence.
Why a Professional Pre-Purchase Inspection is Essential
A DIY caravan damp check before buying serves as an excellent initial filter. It helps you rule out obvious “money pits” quickly. However, even the most diligent amateur inspection has its limitations. Modern caravans are complex structures, and water ingress can hide deep within the insulation or behind structural furniture where a basic consumer meter cannot reach. Professional equipment is far more sensitive and calibrated to provide laboratory-grade accuracy. This level of detail is necessary to catch a slow-developing leak before it turns into a five-figure repair bill. You are not just buying a vehicle; you are investing in your family’s future holidays.
A professional report acts as a powerful negotiation tool. If an inspection reveals a 20% damp reading that you might have missed with a budget tool, you can use that documented evidence to either walk away or negotiate thousands of pounds off the asking price. It turns a stressful gamble into a logical business transaction. Professional findings provide the clarity you need to proceed with confidence or the justification to keep looking for a better deal.
Expert Insight vs DIY Guesswork
High-end, calibrated equipment provides readings that budget meters simply miss. More importantly, a professional engineer brings years of experience in spotting “covered up” damp. It isn’t uncommon to find fresh paint or new wallboards installed specifically to hide rot from an unsuspecting buyer. Beyond the moisture levels, our pre-purchase inspections provide a comprehensive health check for any used caravan. This includes a Gas Safety Test and an Electrical System Test. Knowing these systems are safe for your family is the ultimate way to achieve true peace of mind. We act as your technical advocate throughout the buying process.
Our Local Service in South Yorkshire
We understand that buying a caravan often involves travelling to see the vehicle. Our mobile advantage means we meet you at the seller’s location, whether that is in Sheffield, Doncaster, Barnsley, Rotherham, or Chesterfield. There is no need to arrange transport to a workshop; our engineer brings the expertise directly to the caravan’s current location. This convenience allows you to make an informed decision on the spot without the pressure of a quick sale. We take pride in being a “safe pair of hands” for local buyers, providing honest and transparent reports that respect your time and your budget. If you have found a caravan you love and want to ensure it is as dry as the seller claims, you can request a professional inspection today.
Secure Your Investment with a Professional Final Check
You now have the knowledge to spot the most common signs of water ingress, from musty odours to spongy wallboards. Whilst a DIY caravan damp check before buying is a vital first step, it’s often the invisible issues that cause the most long-term damage. Identifying these early protects your hard-earned cash and ensures your future holidays remain stress-free. By focusing on critical danger zones and understanding meter readings, you’ve already reduced your risk significantly.
For total peace of mind, our qualified mobile service engineer can provide a comprehensive pre-purchase inspection directly at the seller’s location. We deliver thorough damp and safety reports across Sheffield, Doncaster, and Barnsley, checking everything from gas systems to structural integrity. Don’t leave your investment to chance. We recommend that you book a professional pre-purchase inspection in South Yorkshire before you part with your money. Start your next adventure with the confidence that your new caravan is dry, safe, and ready for the road.
Frequently Asked Questions
Is it worth buying a caravan with a small amount of damp?
Buying a caravan with minor damp is only advisable if the moisture levels are below 20% and you have a clear plan for the repair. Readings in the cautionary zone often indicate a simple seal failure that is easily fixed. However, if the damp is structural or the seller refuses to lower the price to cover professional repairs, it is usually safer to walk away. Always ensure you have a professional estimate before committing to a purchase.
How much does a professional caravan damp report cost in the UK?
The cost of a damp report varies depending on the vehicle’s size and the technician’s location. Whilst some providers offer standalone damp surveys, many buyers find better value in a full pre-purchase inspection that covers gas and electrical safety too. Investing in a professional report is a small price to pay compared to the thousands of pounds you could lose if you unknowingly buy a caravan with structural rot.
Can I fix caravan damp myself if I find it before buying?
DIY repairs are feasible for minor issues like resealing a window or a locker door. However, structural damp involving rotted timber frames and saturated wallboards is a complex task that requires specialist tools and materials. Most buyers find that the sheer volume of labour involved makes DIY structural repairs impractical. If you find significant damp during your initial check, it is better to find a dryer vehicle.
What is the most common place for damp in a caravan?
Window surrounds and awning rails are the most frequent entry points for water ingress. These areas rely on mastic sealant that eventually becomes brittle and cracks due to age and weather exposure. You should also check around roof lights, the battery box, and the four corners of the floor. These zones are most vulnerable to the relentless British rain and road spray whilst towing.
Does a standard habitation check include a full damp report?
A professional habitation check always includes a comprehensive damp survey as a standard requirement. The technician will use a calibrated moisture meter to test a wide range of points throughout the caravan, including hidden areas inside cupboards and lockers. This ensures that any water ingress is identified alongside critical gas and electrical safety tests, providing a complete overview of the vehicle’s current health and safety status.
How long does a professional pre-purchase damp inspection take?
A thorough pre-purchase inspection typically takes between one and two hours to complete. This allows the engineer enough time to perform a methodical caravan damp check before buying, ensuring every high-risk area is tested. The process involves a visual inspection, sensory checks, and a full moisture meter survey. Taking this time is essential to provide a dependable report that accurately reflects the caravan’s structural condition.
Should I buy a damp meter before I go to look at a caravan?
Investing in your own moisture meter is a wise decision for any serious buyer. It allows you to perform a basic caravan damp check before buying during your first viewing, helping you filter out problematic vehicles quickly. Whilst consumer-grade meters are not as accurate as professional equipment, they are excellent for identifying major leaks. Using one gives you the confidence to challenge a seller’s claims with objective data.
What is caravan floor delamination and is it expensive to repair?
Floor delamination is the separation of the plywood and foam layers within the floor structure, resulting in a spongy or bouncy feel. While not always caused by damp, it is a significant structural fault that requires injecting specialist resins to rebond the floor. The repair process is labour-intensive and can be costly depending on the size of the affected area. It is a critical issue to identify before finalising any deal.